
- (A)Soziale Netzwerke (117)
- Apple (108)
- iPhone (54)
- Artwork (237)
- Augmented Reality (21)
- Browser (116)
- Bücher (35)
- CPUs (83)
- DRM (18)
- Fahrzeuge (51)
- Filme (197)
- Games (129)
- Nintendo (7)
- PlayStation (29)
- Steam (5)
- XBox (9)
- Gesundheit (18)
- Gizm{e}os (876)
- Intern (159)
- Google (191)
- Android (101)
- Grafikkarten (36)
- Grünzeug (25)
- Hacking (295)
- 3D-Drucker (9)
- Arduino (2)
- Raspberry Pi (19)
- Handy & Smartphone (157)
- Internet (594)
- JaGutÄhhh… (139)
- Künstliche Intelligenz (64)
- LEGO (17)
- Linux (187)
- Mechas (22)
- Microsoft (90)
- Militär (97)
- Musik (99)
- HiFi (9)
- PC (222)
- Photo (126)
- Retro (84)
- Subkulturen (212)
- Cyberpunk (106)
- Cyborg (31)
- Cypherpunk (5)
- Steampunk (8)
- Tablets (33)
- Überwachung (179)
- Virtuelle Realität (129)
- Weltraum (99)
- Zukunft (543)
- Androiden (1)
- Kryptowährungen (25)
- on atuin: magische shell-historie: “Klar, gerne. Megaprojekt! Besonders gefreut hat mich, dass nicht nur eine Riesenresonanz auf das Tool entstand. Sondern dass das jetzt…” Feb. 8, 18:54
- on atuin: magische shell-historie: “Das Projekte kannte ich noch gar nicht, behebt aber mit der „magische Shell-Historie“ ein echtes Linux Problem. Werde mir das…” Feb. 2, 14:18
- on seiko: seriennummer verraet herstellungsdatum: “260306: Juni 2002 (oder 1992, 1982 etc.) oder früher. War die 306. Damenuhr im Juni dieses Jahres. Wert: da hilft…” Nov. 1, 21:50
- on seiko: seriennummer verraet herstellungsdatum: “Wer kann mir sagen welches Bj. und heutiger Wert Seiko Damen Uhr 24 mm Lederarmband Quarz 8522-0040 260306” Nov. 1, 21:23
- on wie wird windows 11?: “Es gibt ein gutes Sprichwort aus der IT: „never change a running system“. Wenn W10 für dich funktioniert hat, brauchst…” Dez. 6, 18:48
- AICP
- AOKP
- Bitcoin.de
- buggedplanet.info
- CoinGecko
- Current Events
- Dianes PS3-Hack-Page
- Digg.com | Technology
- Dirty Unicorns
- Distrowatch
- DuckDuckGo
- Dystopia Tracker
- FRNDC
- Glitch
- GORG
- GSMArena
- Heavypoly Industries
- href.ninja
- Inhabitat
- JPCARS
- KALI Linux
- Kasia Van Maren
- Kryptowiki
- Line Mode Browser
- ListenBrainz
- MAKE Magazine
- nipponart
- OTAKU GANGSTA
- Outgrow.me
- Paranoid Android
- PC Erfahrung
- Prism-Break
- Raspberry Pi Forum
- Satoshi sein Senf
- Slashdot
- SlimRoms
- Smartphone-Rangliste
- Stack Overflow
- Startpage
- The Intercept
- Walkman Central
- WordPress-Planet
- WorldWideWebSize
- XDA Developers Forum
- YAABy
- Zockerseele


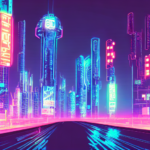
My laptop CPU became an artist over night:

What we see here is actual unique artwork my CPU created over a timeframe of approx. 12 minutes. The only thing I input to was the text string a cyberpunk cityscape and let Stable Diffusion do the rest. It’s beautiful and detailed. I actually love it!
Stable Diffusion is a sophisticated, brand new deep learning model by Stability.ai. It’s already on par with the earlier released, proprietary AI image generators DALL-E 2 or Imagen. With a powerful difference: you can actually create AI images yourself for free on your local machine. Usually done by your GPU, or like in my case above, your CPU, if capable.
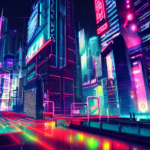
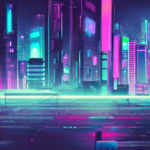
I put four hours of work into it yesterday to setup my machine and create more artwork. My CPU came up with more beautiful cyberpunk cityscape examples with the following text string, a cyberpunk cityscape in neonlights at night, see the gallery here:
-

- a cyberpunk cityscape in neonlights at night

-
- a cyberpunk cityscape in neonlights at night

-

- a cyberpunk cityscape in neonlights at night

-
- a cyberpunk cityscape in neonlights at night

-
- a cyberpunk cityscape in neonlights at night

I’m lucky to own a powerful notebook CPU from 2020 with a graphics processor built in. I don’t know if this made a difference or not, the results surely are true for what I anticipated and surpassed my expectations.
But how can you join the CPU AI image generation yourself?
I had time to write it down yesterday and am happy to share it here for free for anyone who might be interested to do this with her/his Linux machine.
Step 0: Create a working directory in your /home
Step 1: Install Python
sudo apt-get update*
yes | sudo apt-get install python3.8*
*could be the installation of Python 3.8 is different to the one mentioned above. In this case just use your package manager of your Linux distribution to get the program installed on your machine.
Step 2: Install Miniconda
wget https://repo.anaconda.com/miniconda/Miniconda3-py38_4.12.0-Linux-x86_64.sh
bash Miniconda3-py38_4.12.0-Linux-x86_64.sh
Step 3: Clone the Stable Diffusion Repository
git clone https://github.com/CompVis/stable-diffusion.git
cd stable-diffusion/
Hint: Repo above only works for graphics cards >= 7GB (V)RAM! Thus…
Step 4: Download the ZIP, extract, copy and paste the contents following optimised version of Stable Diffusion in the folder above:
https://github.com/basujindal/stable-diffusion
Step 5: Create Conda Environment
conda env create -f environment.yaml
conda activate ldm
Step 6: Download Stable Diffusion Weights
curl https://www.googleapis.com/storage/v1/b/aai-blog-files/o/sd-v1-4.ckpt?alt=media > sd-v1-4.ckpt
Step 7: Content blocker deactivation (needed in case your output images are green or black only)
* find and open file pipeline_stable_diffusion.py
* below image = image.cpu().permute(0, 2, 3, 1).numpy() replace anything with this and save the file:
# run safety checker
#safety_cheker_input = self.feature_extractor(self.numpy_to_pil(image), return_tensors=“pt“).to(self.device)
#image, has_nsfw_concept = self.safety_checker(images=image, clip_input=safety_cheker_input.pixel_values)if output_type == „pil“:
image = self.numpy_to_pil(image)#return {„sample“: image, „nsfw_content_detected“: has_nsfw_concept}
return {„sample“: image, „nsfw_content_detected“: False}
Step 8: Generate AI images with the CPU
python optimizedSD/optimized_txt2img.py –device cpu –precision full –prompt „a cyberpunk cityscape“ –H 512 –W 512 –n_iter 1 –n_samples 1 –ddim_steps 50
That’s it! By default you find your created images in the outputs folder. You can enter your deserved text string in „“ and let your machine do the rest. Feel free to share some of your works in the comments if this tutorial helped you.
P.S.: I also had the chance to create GPU images yesterday with this method. The only difference is by removing the part –device cpu from the command line code you find in step eight. It will be much faster but to me the option to let your CPU create actual artwork was very much appreciated and may not be well known for future AI generation images through Stable Diffusion. I had some very nice results. Will share more of my work in future entries here on gizmeo.eu so stay tuned!
 (Rate me? // Beitrag bewerten?)

[…] (hint: I had quotes in here from Cyberpunk mastermind himself in my text, William Gibson…) https://gizmeo.eu/cpu-dreams/ – Estimated IQ: 101 (above […]